How to configure your launcher
This section is about how to use the :
You should have read the ‘List of helper abstractions’ post before reading this, and specially the ‘Pure-Data best practices’ section.
This is a big part of the project, it requires pd-skills, and hopefully you will learn the bits of code you need to start publishing here. We will base our observations on the Acid Bass example which uses all of these features.
First in the launcher you have to create a config variable :
PdDroidPartyConfig config = new PdDroidPartyConfig();right after the line :
super.onCreate(savedInstanceState);then we will use this variable to call methods like this config.myCustomisationMethod.
Multi-view support
The best way to benefit from the multi-view feature, is to break your patch into several abstractions. You will probably want to seperate the gui from the audio core, and probably break the gui into pannels as hinted in the post mentionned above.
This is the case in the Acid_Bass project :
-
AcidBass_core.pd : is the full pd patch. It contains the dsp code, the logic of the sequencer, the clock instanciation, the load and save mechanism instanciation … well pretty much everything except the gui.
-
AcidBass_audioControls, AcidBass_noteOptions.pd, AcidBass_noteSelector.pd : are each a pannel of the gui views, containing pd gui objects, and custom abstractions. Each object communicates with AcidBass_core.pd via the global pd [send] and [receive] system.
Notice the [declare -path ../../../../pd-party/droidparty-abstractions] object again, in each of those abstractions.
Now in eclipse in your launcher file (ie MainActivity.java) right after the line
PdDroidPartyConfig config = new PdDroidPartyConfig(); you can begin the instanciation of your views :
config.guiPatches.put("Harmony", "Acid_Bass/AcidBass_noteSelector.pd");
config.guiPatches.put("Note Options", "Acid_Bass/AcidBass_noteOptions.pd");
config.guiPatches.put("Audio Controls", "Acid_Bass/AcidBass_audioControls.pd");
This is the code for the gui view, the first argument passed is the name of the view, the second one is the path to the abstraction to be loaded in this view.
Once it is done, you can instanciate your core patch :
config.corePatches.add("Acid_Bass/AcidBass_core.pd");And finally proceed with the launch :
PdDroidPartyLauncher.launch(this, config);-
Note 1 : It is best to load your gui views before your core patches for initializations issues that will be discussed in more details in the Persist saving system section.
-
Note 2 : Currently we adivse you not to duplicate gui elements from one view to another as tempting as it may be. This stands more specifically for arrays, as pure-data does not allow you to have multiple arrays with the same name. You can report here if you want to comment on that.
Gui-customization
We provide several level of gui customization by adding a few lines of code to you launcher (ie MainActivity.java). By default you have some simple pd classic gui, with the default colors from your original patch.
Apply a color theme
config.theme = new MonochromeTheme(MonochromeTheme.RED, true);We have a few colors already setup for you, in eclipse you can remove the .RED part and press ctrl + space to activate auto-completion and check which other colors are available.
TODOC : color constants like RED are there to help but you can set any global color …
You can also create a theme with your own colors, you will then have to specify 3 colors, first the main background color, then the widgets background color, and finally the widgets foreground color expressed in hexadecimal form :
config.theme = new MonochromeTheme(0xff101933, 0xff202943, 0xff004ce6);To find the hexadecimal code you can consult a website like this one. An hexadecimal color code is composed of 6 characters numbers or letters, and you have to add the prefix 0xff. In the above line the colors are different kinds of blue.
TODOC : more about SVG and/or PNG theming ? even if SVG is not fully supported … ? at minima : it exists and it’s an experimental feature …
Use factory components
Those are ready to be used for slick look, almost out of the box. You can refer to this post to get a list of all possible overrides.
To take a simple example, you can apply a custom look, on all the sliders of your patch by using typeOverrides, for instance the line of code below once added to you launcher will make your app draw all sliders as filled rounded rectangles.
config.typeOverrides.put(Slider.class, RibbonSlider.class);You can also apply this look to only one slider, the slider with the label ‘mySlider’, set via properties directly in Pure-Data.
config.objectOverrides.put("mySlider", RibbonSlider.class);After adding a line like this one in your launcher you may end up with an error, you just have to use the keyboard shortcut ctrl + shift + o to import the missing classes in you package.
FYI this manipulation (for a slider) will just write those two lines of code at the top of the MainActivity.java file.
import net.mgsx.ppp.widget.core.Slider;
import net.mgsx.ppp.widget.custom.RibbonSlider;
Develop custom overrides of components
You can developp custom overrides of components, those overrides can be graphical, but also on the interaction level. At this level you might want to consult the wiki.
The AcidBass example features a simple override to draw an array with a custom grid. The Wobbler example features a more advanced example combining two horizontal radio buttons linked to a slider to select the wobbling speed !
Persist saving system
For the saving system we choose to developp our own system, mainly because sssad was very slow when saving arrays with a lot of samples (saving 1s of audio was taking too much time for instance). The system is built to be as simple as possible, and allow to deal with several preset banks - that is to say that you can save your sequencer patterns and synth presets separatly
On the pd side you can check the help patches in /puredata release folder. It relies on the same mechanism as sssad, and it probably cannot do eveything sssad can, but it has pretty much the same limitation and it’s best to know about it … sssad and persist rely on the fact that a single instance of an abstraction will save a value that is received and sent via the messages given as arguments : that means that if you don’t send anything at some point … well, nothing will be saved, and nothing will be restored on load. So the lesson is : ** if you want to save a value be sure to initiate it with a default value on startup.**
With something like this for instance : 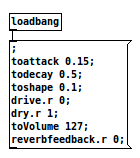 You could also probably create an empty preset, and load it on startup.
That being said there is two main abstractions that you will be interested in to actually save values :
-
[persist-map] : it takes 3 arguments the first one is the name of the preset bank, the second one is the send value of the gui object you want to save, the third one is the receive value of the object you want to load. If you create an object [persist-map synth decay.s decay.r] : you will save your decay value in a the preset bank called ‘synth’.
-
[persist-table] : it takes 2 arguments, the first one is the name of the preset bank, the second one the name of the table object that you want to save/load (regardless of its size - even if it is not made to save to much audio, play nice !)
Now let take a pragmatic example from the acid_bass sample app. As stated before we want to save our parameters in two separate banks : one for sequencer patterns and one fo synth presets. So the first thing to do is to create two objects [loadsave synth] and [loadsave pattern], those act as ‘routers’ for messages.
In the GUI we have three pannels : two of them are for the sequencer, and only one for the synth. We chose to use a bang to activate the display of dialog pannels one for the save action and one for the load action. That makes for bang that send those messages ‘save_pattern’, ‘load_pattern’, ‘save_synth’, ‘load_synth’.
Now we can interface this with persist :
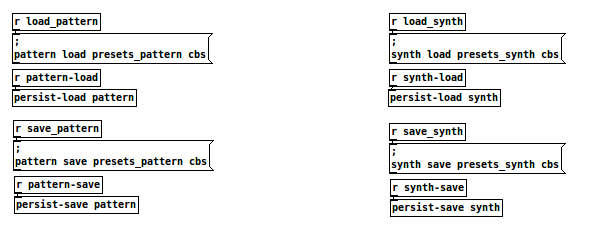
1- we receive a message from a bang, and we create a new message sent with the tag ‘pattern-load’ (two first words), and it sends a path ‘presets_pattern’ and a file format extension ‘cbs’ 2- we receive this message and put it in the input of a [persist-load] object (or [persist-save] depending on the context) with the name of the preset bank as argument. 3- repeat 1 and 2 for other actions, and other banks !
Note : the file format ‘cbs’ will have to be added manually to save on destkop, wether it will be automatically added on android. That is mainly when you want to see a preset saved on a desktop computer in an android application, which will probably be the case of some of factory presets.
For the eclipse part, you just have to reference the path to the preset folder in your configuration :
config.presetsPaths.add("Acid_Bass/presets_pattern");
config.presetsPaths.add("Acid_Bass/presets_synth");
Congratulations you have finished your training and can now save presets !